IDrive is a very attractive option for backing up a home file server. The most attractive features are:
- Large, affordable storage options (as of this writing…)
- 5TB for $79.50/yr
- 10TB for $99.50/yr
- Optional end-to-end private encryption (zero knowledge)
- IDrive Photos – smartphone app that backs up camera photos in real time – (counts toward your storage quota)
- IDrive Sync – (file syncing similar to Google Drive) – comes with its own storage quota, equal to your backup quota (5TB or 10TB), for no extra charge
Since there is no native functionality or plugin in TrueNAS for backing up to IDrive, it is useful to know how to back up TrueNAS to IDrive manually using the IDrive linux scripts.
What is TrueNAS?
TrueNAS Core is a free operating system for running a NAS (network attached storage). It is based on FreeBSD. TrueNAS can easily turn any computer into a NAS. It’s a great way to repurpose a slightly dated PC where top-of-the-line hardware is not needed.
Why Back Up TrueNAS?
If you’re running a home file or media server with TrueNAS, it’s a good idea to back up the server to the cloud in case something goes wrong with the server. There are many cloud storage providers that TrueNAS can back up to directly, but not IDrive.
There are some backup plugins available in TrueNAS, such as Duplicati, which can back up to numerous cloud providers, but unfortunately IDrive is not one of them.
However, there is a workaround. IDrive offers linux scripts written in Perl which can be used to backup a linux server directly to IDrive. This is what we will use to backup TrueNAS to IDrive.
How to Back Up TrueNAS to IDrive
Overview
The process to back up TrueNAS to IDrive is as follows:
- Create a jail in TrueNAS for IDrive
- Install needed packages in the jail (vim, nano, perl5, wget, python, curl, pkg)
- Download and extract the IDrive linux scripts
- Add execute permissions to all the scripts
- Configure IDrive in TrueNAS using the scripts
1. Create a Jail in TrueNAS for IDrive
Great guides for Jails from TrueNAS:
- https://www.truenas.com/docs/core/coretutorials/jailspluginsvms/jails/
- https://www.ixsystems.com/documentation/truenas/11.3-U2/jails.html
A Jail in TrueNAS is similar to a virtual machine, but it shares the kernel with the main operating system. It is an isolated instance of the base operating system that runs on its own. When you create a jail in TrueNAS, you’re basically creating a FreeBSD virtual OS that you can do whatever you want with through the command line.
Why Create a Jail for IDrive?
TrueNAS does have a main shell for the core OS. It is the second to last option on the left pane. You might be wondering, why not use this shell (the core OS) to run the IDrive scripts?
When you launch the main OS shell, there is a warning that says the only supported methods of making system modifications are through the web GUI and the API. In other words, TrueNAS doesn’t want changes made via this shell.
As a precaution, it’s better to set up the IDrive scripts inside a jail to reduce the risk of causing damage to the entire TrueNAS OS via the main shell.
Jails also provide some isolation from the main OS, so if you mess something up, you can just delete the jail and create a fresh one.
Create the Jail
To create a jail for the IDrive scripts, log into TrueNAS, go to Jails in the left pane, and click Add.

Name the jail “idrive” (or whatever you want) and choose the latest release of FreeBSD to use. In my example below, it’s saying the name “idrive” is already in use because I already created a jail with this name. Just ignore that.

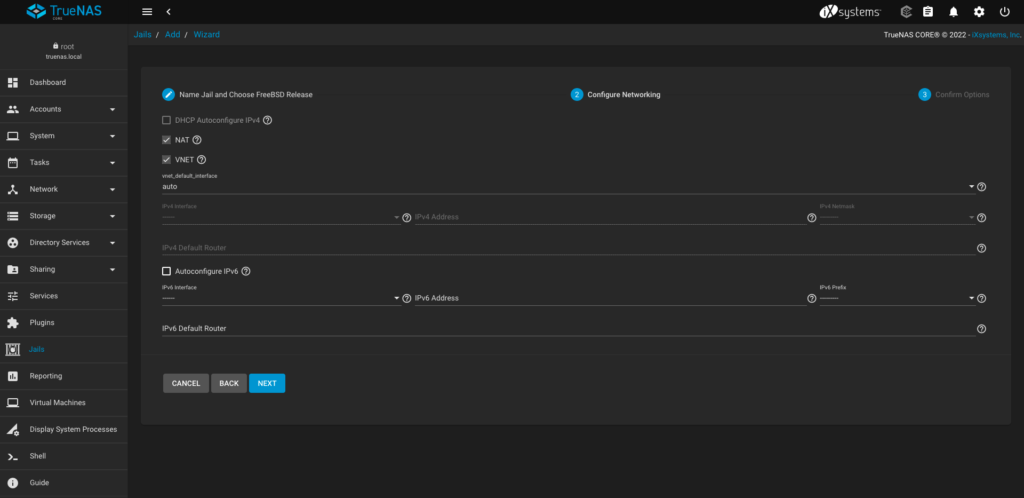
Since this jail running IDrive scripts will need to communicate with IDrive’s servers on the public internet, check “NAT.” This network address translation allows data from your TrueNAS server with a local (private) IP to be sent over the public internet by first translating it to a public IP. This is all handled for you behind the scenes.
This is the only change you need to make on this page. Click next.

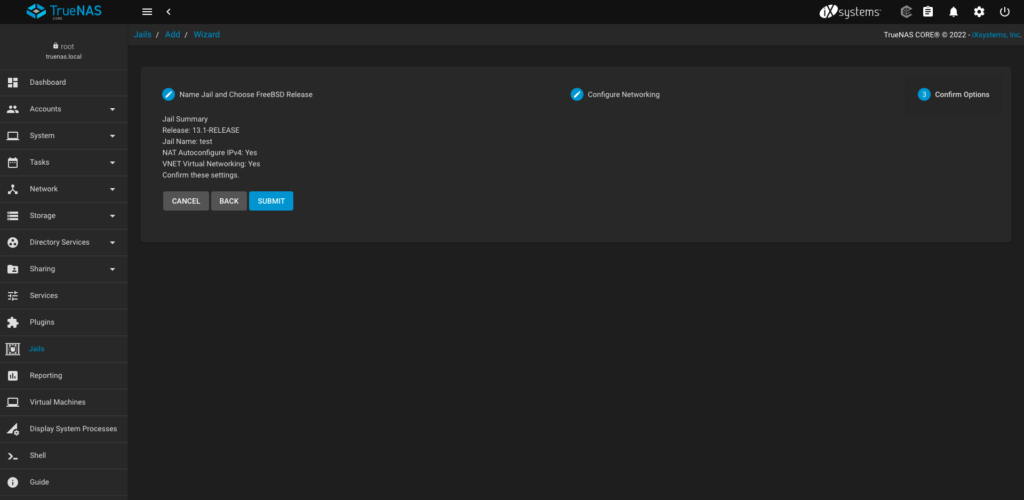
You will get a summary of the jail you just configured. Click submit and the jail will be created.

Jail Buttons
Back on the main Jails screen, the new idrive jail is now present.
You can click “EDIT” to change the jail settings.
“MOUNT POINTS” connects the ZFS storage pools to this jail. The jail is like a virtual machine running independently, so we need to mount the storage pools into the jail’s OS to be able to access the pool files within the jail.
“RESTART” and “STOP/START” control whether the jail is running. This is like turning on and off a virtual machine.
“SHELL” will open a terminal into this FreeBSD operating system. This is where we will configure the IDrive scripts.

Configuring Mount Points
Now let’s configure the mount points. Open the mount points page, and click Actions -> Add.

In the top section, select the ZFS dataset from your pools that you want the jail to have access to.
In the bottom section, select the location in the jail’s filesystem where you want that dataset to be mounted. The standard choice is /media.
Do this for each dataset you want the jail to have access to. You can select “Read Only” if you only want the jail to be able to read the dataset and not modify it. You can configure this individually for each dataset.
After clicking submit, you should be able to open the shell for this jail, navigate to /media, and you should see your datasets there.

2. Install Needed Packages in the Jail (vim, perl5, wget, python, curl, pkg)
vim is needed to edit the IDrive config files.
perl is needed because all the IDrive scripts are written in perl.
wget is needed to download the IDrive scripts directly to the jail.
python is needed for the speed_analysis.pl script to be able to use speedtest.net for the second part of the speed analysis.
It’s possible you might need curl and pkg as well, so it’s a good idea to install these too. pkg is the package manager that lets you install other packages, so naturally you can’t use pkg to install pkg. It should come default in a FreeBSD install, but if not, you will have to figure out how to get it, or use another package manager, both of which are outside the scope of these instructions.
Install
Open the menu for the idrive jail and click “> SHELL” to launch the terminal into that jail.
This shell logs in as root, so no need to use sudo.
Run pkg install vim perl5 wget python curl.
To confirm that perl installed successfully, run perl -v. You should see the following.

3. Download and Extract the IDrive Linux Scripts
Update Mar 30, 2024:
IDrive has changed from using individual Perl scripts to using a compiled binary. See this page for the latest instructions from IDrive.
The process for installing it is similar, it’s just a different URL to download the binary, and different commands for calling the various functions of IDrive for Linux.
The URL to download the binary is:
https://www.idrivedownloads.com/downloads/linux/download-for-linux/linux-bin/idriveforlinux.bin
You can use wget to download it just like in the original instructions below.
The .zip URL in the original instructions below is still alive, so the Perl script method might still work. However it’s probably best to use the latest method endorsed by IDrive.
Navigate to the home folder to store the IDrive scripts.
cd ~/
In FreeBSD (or at least in TrueNAS jails), the home folder is at /root. This differs from Ubuntu, where the home folder is at /home/username. However, in each case, the ~/ shortcut brings you to the respective home folder.
Use wget to download the IDrive scripts package, then use unzip to extract it. You have to contact IDrive to get this download link, but it’s always the same and has been posted on public forums.
wget https://www.idrivedownloads.com/downloads/linux/download-for-linux/IDriveScripts/IDriveForLinux.zip
unzip IDriveForLinux.zip
A folder with the same name as the archive will be created.
4. Add Execute Permissions to All the Scripts
cd ~/IDriveForLinux/scripts
Either of the following will work:
chmod a+x *.pl or chmod +x *.pl
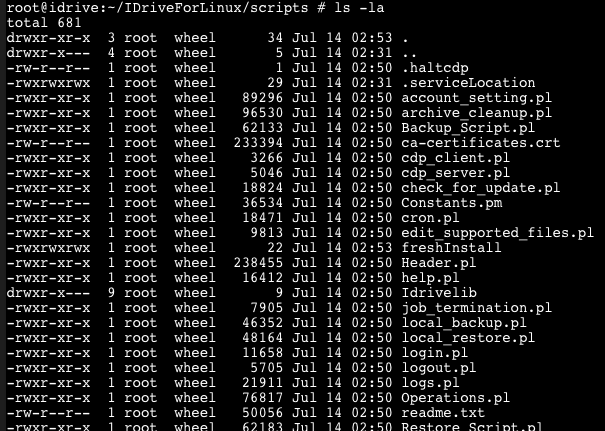
To check the permissions, run ls -la and make sure there are x’s in the permissions for all the scripts.

5. Configure IDrive in TrueNAS Using the Scripts
At this point, head over to the guide to using the linux scripts on IDrive’s website. It is really easy to follow. Start with the ./account_setting.pl script as the guide says. The terminal prompts are interactive and very intuitive.
A few tips:
- Once the IDrive account settings are configured, the TrueNAS server communicates with your IDrive account at all times. If you log into IDrive in the web browser, you should see the TrueNAS server show up under “Computers” with the name of the backup set that you assigned. You can then manage backup operations for the server right from the browser without using the jail terminal again.
- You don’t need to be logged into IDrive in the jail (using
login.pl) for backups to run. As long as the jail is running, it’s connected. You only need to login to IDrive in the jail to make changes to the settings. - If you restart the jail, the connection to IDrive will resume automatically.
Hopefully this helps.

Andrew,
I ran into an issue where I couldn’t get my jail to update to the latest scripts successfully. It would try… but after completion, the jail was still reporting the outdated version of idrive.
I see on their website, the download is: https://www.idrivedownloads.com/downloads/linux/download-for-linux/linux-bin/idriveforlinux.bin (not .zip).
Any chance you are motivated to update the instructions to use the .bin URL and procedure?
Thanks for bringing this to my attention. The zip URL still works, but I see the bin URL is the one IDrive has on their page now, so I’ll add that new URL to the instructions.
Thank for looking into it. When I get to running ./idriveforlinux.bin it just gives me a “command not found” error. Do you have advice on this? Is there a linux vs. freebsd conflict going on?
I get here…
$chmod a+x idriveforlinux.bin
After placing the IDrive for Linux package in the preferred place, run the below command to find the usage options:
$./idriveforlinux.bin
but then I get the error. Screenshot: https://i.imgur.com/6rRRK9A.png
I tried to find advice on the web to resolve the error but couldn’t get anywhere.
PS. all the pkgs installed fine.
You have to execute the command in a shell, like this
sh ./idriveforlinux.bin –install
but I suspect IDrive For Linux is not supported for FreeBSD.
Other ideas to try:
– Run `ls -la` to confirm the execute permissions have been added
– Make sure shell is present at `/bin/sh`. If a different type of shell is being used, you will need to call that shell instead (ex. `zsh` or `bash`). Although the executable might only be compatible with one type of shell. The standard shell in FreeBSD should be `sh`.
– Run `file idriveforlinux.bin` to make sure the file is an executable compatible with your architecture. You should get something like `ELF 32-bit LSB executable` or `executable for x86-64`.
Thank you for the guide.
On running the Backup script I receive a bunch of “You can’t run supporting scripts manually” messages. Can you please advise if that to be expected?
It’s hard to say without seeing exactly what you’re seeing. I would make sure you’re logged in (login script), check file permissions (see above), and read this page (https://www.idrive.com/readme) to make sure you’re running the scripts properly. It’s possible something is not configured correctly. When I run “./Backup_Script.pl” it starts scanning files right away.
Your guide is simply perfect, now I need to understand how to start automatically after the reboot of TrueNAS the Jailbox!
Followup… when I made my SMB’s I changed root/wheels as the owner to a specified user/group thinking I only wanted a PC user to have access; but the iDrive jail uses root/wheels – so the error was my SMB share setup, disallowing the jail to read the files. It looks like it can compile/prepare a file list now instead of failed after listing a couple directories and terminating. I like the idea of having a specific jail user instead borrowing root… it seems more secure but maybe it’s not.
–
Side note – on QNAP you could schedule multiple jobs… w/ iDrive/Linux scripts it appears you can have only 1 default backup set via the web dashboard/computer console. I like having a seperate backup job which handles large PC backup files (10’s to 100’s of GBs) – that way small files can run in parallel instead of being held hostage by the large file in queue/process. One solution I’m mulling for TrueNAS is you just create two idrive jails…. one for small files nightly backup, an another for large files, each with their repective mounts for scheduled backups.
Cheers again!
It sounds like you figured out your problem. Regarding the issue of separating small and large backups, I looked through the IDrive linux scripts and web dashboard and I can’t think of a way to create separate backup processes on different schedules for the same machine. You can select multiple folders to back up, but I don’t think you can have them run on different schedules. I think your idea of fooling IDrive into thinking a single machine is actually multiple machines, using separate jails, is a good idea to try.
Andrew – I’ve hit another snag. the jail has a couple directories mounted like you explain, and I see them in the idrive web consol under my new TrueNAS machine, but it seems the jail can’t actually read the files in the directory. I only have two users setup to access the directories with current ACLs. Do you have to make a user for the jail, and add the user to the ACL… or some otherway to allow the jail to read the contects of the directories you mount to the jail? If you have any guidance (or time to share it) I’d appreciate it.
Interesting, I don’t think I had this problem. One thing you could try is checking “Apply permissions recursively” in the ACL settings. I’ve had situations where I grant access but files aren’t readable, and when I go back and check this, it works.
Couple very minor bugs… my iDrive jail needed pkg and curl installed, found out at different times but maybe you could add those to the list of packages to install before running idrive scripts.
Thanks for pointing that out. I added this to the section about installing packages.
Awesome write up – and just what I was looking for! Thanks for taking the time to log this info.
No problem, thank you Patrick!